In this post we will turn lamps – connected to a remote switch – on and off via openHAB.
Used components
The following components have been used to realize the light control:
- Raspberry Pi (35 Euro) with openHAB installed
- Elro Wireless Home Control AB440S/3C (3 Remote controlled power switches, 15 Euro)
- 433Mhz RF Transmitter Module (2 Euro)
- Some jumper cables & wire as antenna
Hardware setup
First, the RF Transmitter Module needs to be installed on the Raspberry Pi. Check your RF Module and Raspberry Pi for the correct connections (I will not go into detail here as a lot of tutorials are already available online).
The RF Transmitter module has three pins: Ground, VCC and Data. In my case, I needed to connect Data with GPIO 17:

I also soldered an antenna to the transmitter which tremendously increased the range.
Software installation/configuration
First, we need to install wiringPi (library to access the GPIO pins of the Raspberry Pi) as it is a prerequisite for rcswitch-pi (library to talk to the RF Transmitter):
sudo mkdir /opt/rc-switch

cd /opt/rc-switch

sudo git clone git://git.drogon.net/wiringPi

cd wiringPi

sudo ./build
Now we install rcswitch-pi:
cd /opt/rc-switch

sudo git clone https://github.com/r10r/rcswitch-pi.git

cd rcswitch-pi

sudo make
Afterwards, we should be able to trigger the remote switch via
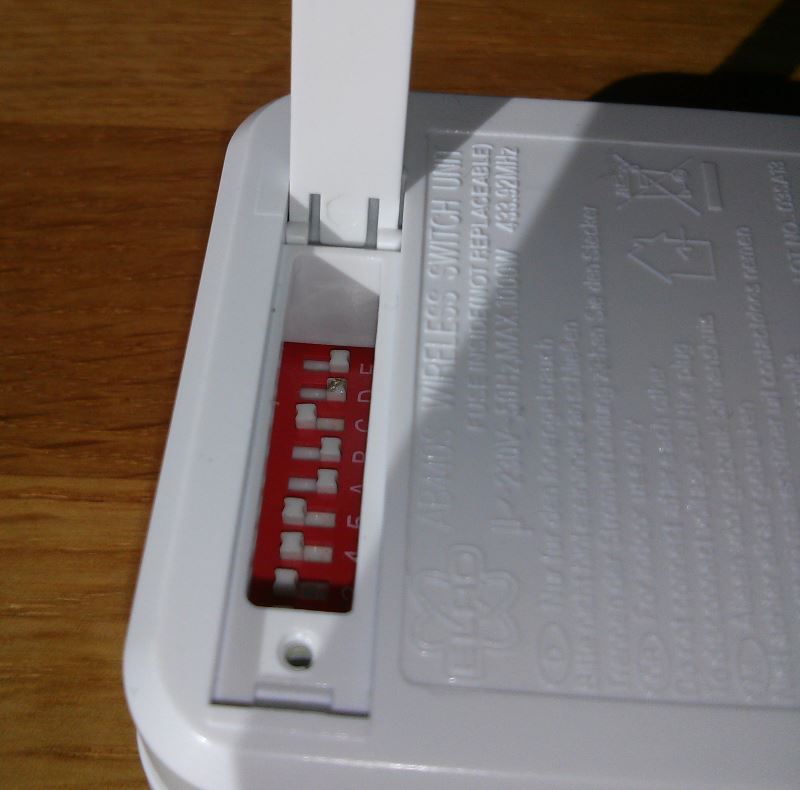
sudo ./send 11111 3 1
where 11111 is the System-Code and 3 is the unit-code according to our DIP-switch settings on the remote power switch to be controlled. The last parameter is 1 (ON) or 0 (OFF).
OpenHAB configuration
exec binding
First, if not done already, we need to copy the exec binding (included in the openHAB addons package) to our openHAB/addons directory. This binding enables us to later call the command line (and therefore rc-switch) from openHAB.
Switch scripts
Now we can create two shell scripts in folder /opt/rc-switch/ to be called from openHAB: switchOn.sh and switchOff.sh:
#!/bin/bash

for run in {1..5}

do

/opt/rc-switch/rcswitch-pi/send 11111 $1 1

done
And also make them executable:
sudo chmod +x switchOn.sh switchOff.sh
The unit-code is passed as the first parameter ($1) to the script. The system-code (11111) is hard-coded. If we’d have more than one system-code, we need to pass it as a parameter, too.
On the one hand, these two scripts simplify calls from openHAB (as we will see soon). On the other hand, it increases the chance for successfully transmitting the command by sending it multiple (5) times. As there is no message to acknowlegde retrieval of the command by the remote switch and messages sometimes get lost/distorted, this is probably the easiest way to make sure the switch command gets through eventually.
Allow execution of the switch scripts as root
If we run openHAB as user ‘openhab’ (i.e. not as root), we need to make sure user ‘openhab’ is allowed to run the switch scripts as root without the need to enter a password, because wiringPi needs to be run as root.
One way to achieve this is to run sudo visudo and allow user openhab to run scripts on path /opt/rc-switch/switch* (which includes switchOn.sh and switchOff.sh) as root without entering a password:
# User privilege specification

root    ALL=(ALL:ALL) ALL

openhab ALL=NOPASSWD: /opt/rc-switch/switch*
Be careful when using visudo as it is easy to mess up the complete system!
Add openHAB item
Finally it is time to add a switch to openHAB to turn our lights on and off! With all the preparation we have done above, this is quite simple now:
Switch Lamp_LV_Standing "Standing Lamp" {exec=">[OFF:sudo /opt/rc-switch/switchOff.sh 1] >[ON:sudo /opt/rc-switch/switchOn.sh 1]"}
This will add an item to openHAB to turn our remote switch with unit-code 1 on and off. After adding the item to our sitemap, the switch should appear in openHAB:

Disadvantages
Even though this solution is a great way to add smart lamps to one’s home, it has two disadvantages:
- One-way communication: The communication is only from the RF Transmitter / Raspberry Pi to the power switch. We neither get feedback if the light on/off signal really reached the power switch nor it is possible to check the current state of the remote switch. – No security (can be controlled from the outside / from neighbours)
- No Security: The communication channel is not secure, which means anybody who is in transmission range and knows/guesses the system and unit code of the power switches can switch our lights on and off. This might be acceptable for LED lamps, but I wouldn’t connect devices like an electricity heater.
Summary
All in all, if one can live with these disadvantages and the manual configuration, this is probably the cheapest solution for smart lamps and a great way to get started with a smart home!
Here is a video with the smart lamps in action, controlled via HABDroid (Android mobile client for openHAB):
you mister, very awesome person!
this page helped me out setting my raspberry pi hooked up with generic RF 433mhz transceiver turning on/off RF outlet
your coding works on openHAB.
Thanks very much!
Hi, i did a similar project with openhab installed in a raspberry b+ with rf.
But i have some issues with the rf, if i executed the command from the command line works fine, but from openhab not always works. any ideas?.
Other commands with exec binding works fine too, the only with problems is the rf script.
That’s difficult to say. Did you check the openHAB log files if the exec command is triggered correctly every time?
I am not sure if I remember correctly, but in the beginning I had the #!/bin/bash missing in the switchOn/Off scripts, which caused the loop to be ignored when the script was executed from openHAB. With only 1 instead of 5 transmissions, the light might sometimes turn on and sometimes not. Not sure if this makes sense but it could be worth to check in your scripts.
Great short article, Thanks for that
for my set up, i also had to attach the exec binding into the addons folder.
Thanks for your feedback, I have added a paragraph about the exec binding!
thanks very much for the response!, i add the line in the script but it works sometimes. particularly at the beginning.
This was exactly what I was looking for. I got the 1 part working ie. connecting the raspi with the RF receiver/transmitter. I am just using wiringpi and Tim’s rfoutlet, the link: https://www.samkear.com/hardware/control-power-outlets-wirelessly-raspberry-pi . I installed openhab, but had no idea what to with the items/sitemap. Did you define any groups in your items files? Is there anything else you have to do to in the sitemap file. I am pasting what I have done in the config files. Could you advise on what I am missing. Apparently I cannot see the switch
==================================== items =================
Group All
Group gGF (All)
Group gFF (All)
Group gC
Group GF_Living “Living Room” (gGF)
Group GF_Kitchen “Kitchen” (gGF)
Group GF_Toilet “Toilet” (gGF)
Group GF_Corridor “Corridor” (gGF)
Group FF_Bath “Bathroom” (gFF)
Group FF_Office “Office” (gFF)
Group FF_Child “Child’s Room” (gFF)
Group FF_Bed “Bedroom” (gFF)
Group FF_Corridor “Corridor” (gFF)
Group:Switch:OR(ON, OFF) Lights “All Lights [(%d)]”
Switch Light_GF_Corridor_Ceiling “Ceiling” (GF_Corridor, Lights){exec=”>[OFF:sudo /var/www/rfoutlet/codesend 1381692] >[ON:sudo /var/www/rfoutlet/codesend 1381683]”}
======================= Sitemap ===========================
sitemap demo label=”Home Automation”
{
Frame label = “Light_Switches” {
Switch item=Light_GF_Corridor_Ceiling label=”Ceiling” mappings=[ON=”On”, OFF=”Off”]
}
}
===========================================================
I will be trying this one tonight. And post the results.
Thank you
S N
Hello,
your items and sitemap file looks fine to me. Do you see the other elements of the sitemap correctly, like the sitemap label (“Home Automation”) and the Frame (“Light_Switches”)? You could also try to add some simple text item, so see if it is generally working.
Hi Dominic,
I do see Home Automation that’s all. Nothing else.
Hi.
Thanks for the post.
Have you measure the length how far the transmitter can be before it can’t send the signal?
Hi, I didn’t measure it, however in my home it is working at approx. 5 meters.
I’m having problems with wiringPi. I can turn the switches on and off from the command line with sudo, and I don’t need to use sudo when running other programs because I’ve made sure to edit the sudoers file and my user openhab is also member of the group sudo, so I can run files without sudo.
The problem is I can’t run programs that use wiringPi because it complains not being sudo. So I can actually trigger the switches via PHP, and via command line using sudo, but not via openhab because even though the log says it runs the script it halts because of authentication failure.
Any ideas? I’ve looked at your tutorial many times and I can’t figure out why it’s working for you and not for me..
Hi, are you calling something like
sudo /opt/rc-switch/rcswitch-pi/send 11111 1 1from your openHAB switch item? Do you get the same error with and without using sudo?Alternativly, you could have a look at this approach (haven’t tried it myself, though).