This post describes the setup to get the Aeotec Aeon Labs MultiSensor running with openHAB. The Z-Wave.me USB Stick is used on a RaspberryPi as the Z-Wave controller.
Hardware used for this project:
- RaspberryPi with openHAB
- Z-Wave.me Z-Wave USB Stick (ZME_UZB1, 28 Euro)
- Aeotec Aeon Labs MultiSensor 4in1 (54 Euro)
The setup can be divided in three parts: Installing and configuring the Z-Wave stick, connecting and configuring the MultiSensor and finally configuring the items in openHAB.
Installing the Z-Wave.me USB Stick
The installation of the Z-Wave Stick on the raspberryPi was quite easy. After plugging in the USB stick, it is automatically detected without additional software installation. Correct detection of the USB stick can be verfied with the lsusb command:
pi@raspberrypi / $ lsusb

Bus 001 Device 002: ID 0424:9514 Standard Microsystems Corp.

Bus 001 Device 001: ID 1d6b:0002 Linux Foundation 2.0 root hub

Bus 001 Device 003: ID 0424:ec00 Standard Microsystems Corp.

Bus 001 Device 008: ID 0658:0200 Sigma Designs, Inc.
The “Sigma Designs, Inc.” device is our Z-Wave.me Z-Wave USB stick.
Now we need to find out on which path the USB stick is mounted. Using the dmesg command right after the USB stick has been plugged in should show the detection of a new USB device. The following line of the output is important for us:
[66278.527593] cdc_acm 1-1.3:1.0: ttyACM0: USB ACM device
This indicates that the Z-Wave USB stick has been mounted to /dev/ttyACM0. This path might be different for other Z-Wave USB sticks or systems. Check out this answer on askubuntu.com if you have trouble finding the correct path.
If openHAB is executed with restricted rights (i.e. not as root) as it is the case for me, we have to add the user account (in my case: “openhab”) to group “dialout”. This is only necessary for USB sticks which are registered as a modem (recognizable by the ACM in the path). Otherwise, openHAB will not be able to use the Z-Wave stick.
The configuration in openHAB itself is simple. We just have the define the mounted path in the Z-Wave binding section of the openhab.cfg:
zwave:port=/dev/ttyACM0
Of course don’t forget to add the z-wave binding to the openHAB addon folder!
Connecting the Aeon Labs MultiSensor
At this point we need some administration console for the Z-Wave controller. As openHAB is already installed, HABmin is the easiest choice. After the installation of HABmin, the Z-Wave network can be configured via the HABmin web console / Configuration / Bindings / org.openhab.binding.zwave / Devices:
Initially, only the Z-Wave USB controller should be displayed. Now the Aeon Labs MotionSensor can be included into the Z-Wave network. By selecting the “Include”-button in the Devices tab, the controller will search for 30 seconds for Z-Wave devices. Pressing the button on the backside of the MultiSensor during this period will include the device.
Configuring the Aeon Labs MultiSensor
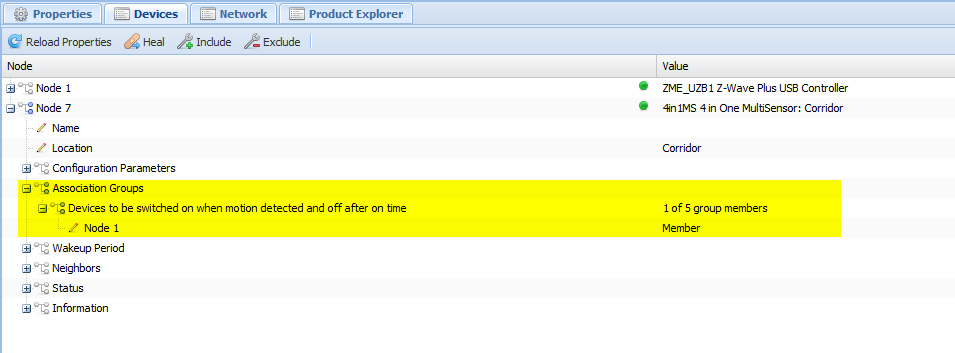
Now, we need to configure the MultiSensor through HABmin according to our needs. First, the sensor needs to know which devide to notify when motion is detected. In our case, we set the Z-Wave.me stick as a member of association group “Devices to be switched on when motion detected and off after on time”:
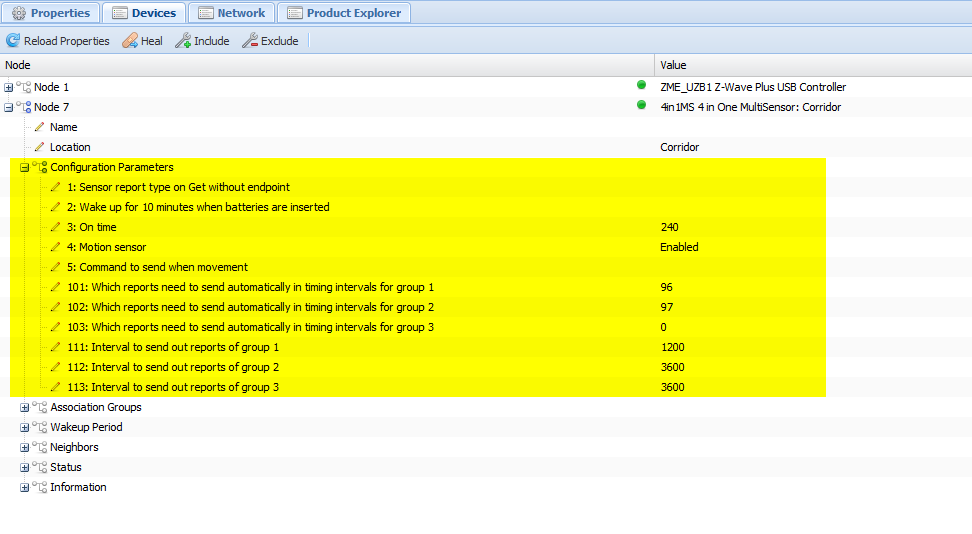
Now we can defined which values should be reported and how often. There are quite some configuration parameters available, for a full explanation please see this documentation (pdf). I will only explain the most important parameters for our purposes:
- 3: The time (in seconds) how long the MultiSensor will stay in ON-mode after the last motion was detected. When no motion was detected for the defined time, the MultiSensor will send the “OFF” signal
- 101/102/103: The MultiSensor can report temperature, humidity, luminosity and battery level. For each group, we can define which of these values should be included. This is done by adding up the unique number of each sensor value we want to report. These numbers are:
- luminosity: 128
- humidity: 64
- temperature: 32
- battery level: 1
In the screenshot below group 1 contains humidity and temperature (64+32=96), group 2 contains humidity, temperature and battery level (64+32+1=97) and group 3 is not used (0).
- 111/112/113: These parameters define in which interval (in seconds) the reports of groups 1-3 are sent. In the below example, a report is sent every 20 minutes for group 1 (humidity and temperature) and every 60 minutes for group 2 (humidity, temperature and battery level). The less information is sent, the less battery is consumed.
Setting up these parameters depends highly on your specific use case and if the MultiSensor is powered or running on batteries.
Note that the MultiSensor is sleeping most of the time when running on batteries. This also means that configuration changes are not immediately transferred. Thus is might be necessary to wake the sensor up manually multiple times (by pushing the button on the back side) until all changes are successfully applied.
Configuration of openHAB
Now the only thing left is to setup openHAB to display the sensor values reported by the MultiSensor. This is quite easy, as we only have to define an item for each sensor (and possibly add the items to the sitemap):
Number Aeon_Temperature "Temperature [%.1f °C]" {zwave="7:command=sensor_multilevel,sensor_type=1" }
Number Aeon_Humidity    "Humidity [%d %%]"      {zwave="7:command=sensor_multilevel,sensor_type=5" }
Number Aeon_Battery     "Battery [%d %%]"       {zwave="7:command=battery" }
Switch Aeon_Motion      "Motion detected"       {zwave="7:command=basic" }
The exact meaning of these item configurations and much more can be found at the openHAB Z-Wave binding wiki page.
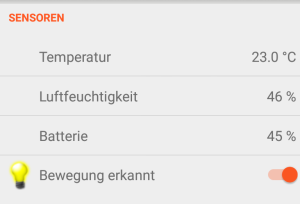
Afterwards, the newly added items can be admired in openHAB!


