Using the Aeon Labs Z-Wave MultiSensor with openHAB

This post describes the setup to get the Aeotec Aeon Labs MultiSensor running with openHAB. The Z-Wave.me USB Stick is used on a RaspberryPi as the Z-Wave controller.

Hardware used for this project:

  • RaspberryPi with openHAB
  • Z-Wave.me Z-Wave USB Stick (ZME_UZB1, 28 Euro)
  • Aeotec Aeon Labs MultiSensor 4in1 (54 Euro)

The setup can be divided in three parts: Installing and configuring the Z-Wave stick, connecting and configuring the MultiSensor and finally configuring the items in openHAB.

Installing the Z-Wave.me USB Stick

The installation of the Z-Wave Stick on the raspberryPi was quite easy. After plugging in the USB stick, it is automatically detected without additional software installation. Correct detection of the USB stick can be verfied with the lsusb command:

pi@raspberrypi / $ lsusb
Bus 001 Device 002: ID 0424:9514 Standard Microsystems Corp.
Bus 001 Device 001: ID 1d6b:0002 Linux Foundation 2.0 root hub
Bus 001 Device 003: ID 0424:ec00 Standard Microsystems Corp.
Bus 001 Device 008: ID 0658:0200 Sigma Designs, Inc.

The “Sigma Designs, Inc.” device is our Z-Wave.me Z-Wave USB stick.

Now we need to find out on which path the USB stick is mounted. Using the dmesg command right after the USB stick has been plugged in should show the detection of a new USB device. The following line of the output is important for us:

[66278.527593] cdc_acm 1-1.3:1.0: ttyACM0: USB ACM device

This indicates that the Z-Wave USB stick has been mounted to /dev/ttyACM0. This path might be different for other Z-Wave USB sticks or systems. Check out this answer on askubuntu.com if you have trouble finding the correct path.

If openHAB is executed with restricted rights (i.e. not as root) as it is the case for me, we have to add the user account (in my case: “openhab”) to group “dialout”. This is only necessary for USB sticks which are registered as a modem (recognizable by the ACM in the path). Otherwise, openHAB will not be able to use the Z-Wave stick.

The configuration in openHAB itself is simple. We just have the define the mounted path in the Z-Wave binding section of the openhab.cfg:
zwave:port=/dev/ttyACM0

Of course don’t forget to add the z-wave binding to the openHAB addon folder!

Connecting the Aeon Labs MultiSensor

At this point we need some administration console for the Z-Wave controller. As openHAB is already installed, HABmin is the easiest choice. After the installation of HABmin, the Z-Wave network can be configured via the HABmin web console / Configuration / Bindings / org.openhab.binding.zwave / Devices:

HABmin Web Console

Initially, only the Z-Wave USB controller should be displayed. Now the Aeon Labs MotionSensor can be included into the Z-Wave network. By selecting the “Include”-button in the Devices tab, the controller will search for 30 seconds for Z-Wave devices. Pressing the button on the backside of the MultiSensor during this period will include the device.

Configuring the Aeon Labs MultiSensor

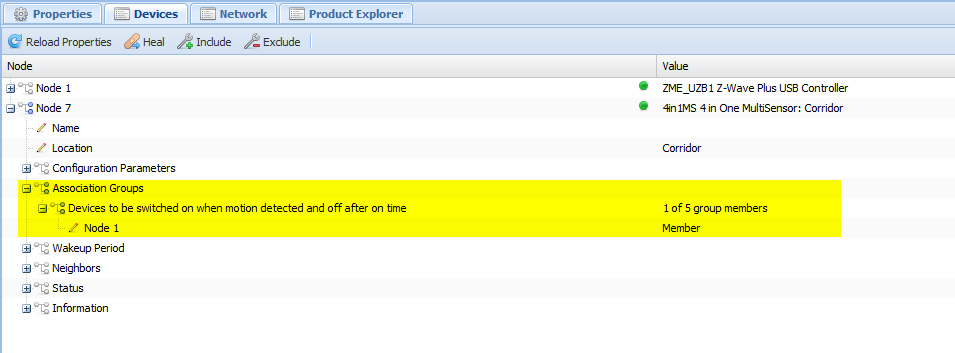
Now, we need to configure the MultiSensor through HABmin according to our needs. First, the sensor needs to know which devide to notify when motion is detected. In our case, we set the Z-Wave.me stick as a member of association group “Devices to be switched on when motion detected and off after on time”:

MultiSensor Association Groups

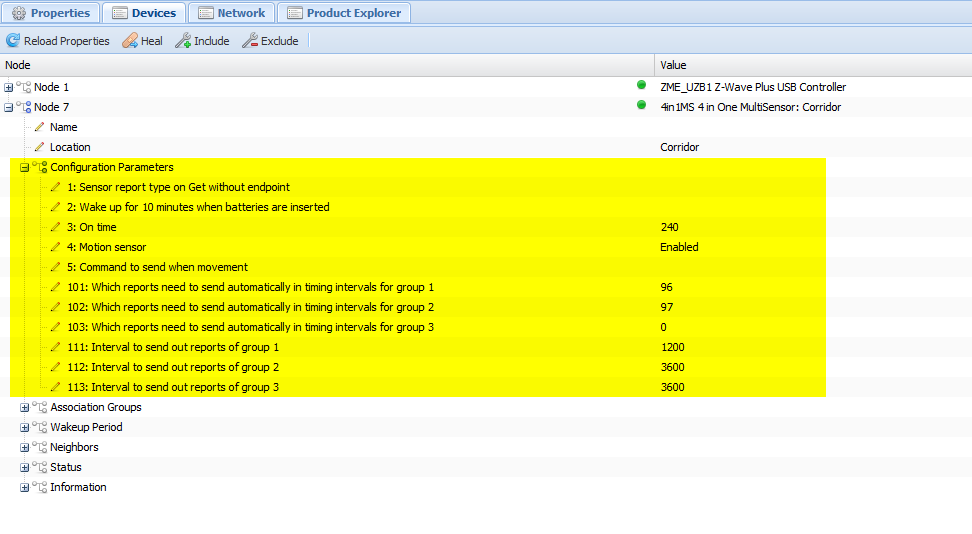
Now we can defined which values should be reported and how often. There are quite some configuration parameters available, for a full explanation please see this documentation (pdf). I will only explain the most important parameters for our purposes:

  • 3: The time (in seconds) how long the MultiSensor will stay in ON-mode after the last motion was detected. When no motion was detected for the defined time, the MultiSensor will send the “OFF” signal
  • 101/102/103: The MultiSensor can report temperature, humidity, luminosity and battery level. For each group, we can define which of these values should be included. This is done by adding up the unique number of each sensor value we want to report. These numbers are:
    • luminosity: 128
    • humidity: 64
    • temperature: 32
    • battery level: 1

    In the screenshot below group 1 contains humidity and temperature (64+32=96), group 2 contains humidity, temperature and battery level (64+32+1=97) and group 3 is not used (0).

  • 111/112/113: These parameters define in which interval (in seconds) the reports of groups 1-3 are sent. In the below example, a report is sent every 20 minutes for group 1 (humidity and temperature) and every 60 minutes for group 2 (humidity, temperature and battery level). The less information is sent, the less battery is consumed.

MultiSensor Configuration

Setting up these parameters depends highly on your specific use case and if the MultiSensor is powered or running on batteries.

Note that the MultiSensor is sleeping most of the time when running on batteries. This also means that configuration changes are not immediately transferred. Thus is might be necessary to wake the sensor up manually multiple times (by pushing the button on the back side) until all changes are successfully applied.

Configuration of openHAB

Now the only thing left is to setup openHAB to display the sensor values reported by the MultiSensor. This is quite easy, as we only have to define an item for each sensor (and possibly add the items to the sitemap):

Number Aeon_Temperature "Temperature [%.1f °C]" {zwave="7:command=sensor_multilevel,sensor_type=1" }
Number Aeon_Humidity    "Humidity [%d %%]"      {zwave="7:command=sensor_multilevel,sensor_type=5" }
Number Aeon_Battery     "Battery [%d %%]"       {zwave="7:command=battery" }
Switch Aeon_Motion      "Motion detected"       {zwave="7:command=basic" }

The exact meaning of these item configurations and much more can be found at the openHAB Z-Wave binding wiki page.

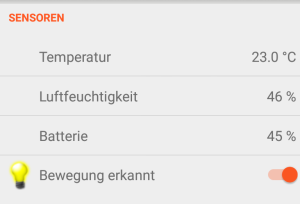
Afterwards, the newly added items can be admired in openHAB!

MultiSensor Items

Controlling lights with openHAB, Raspberry Pi and 433Mhz remote switches

In this post we will turn lamps – connected to a remote switch – on and off via openHAB.

Used components

The following components have been used to realize the light control:

  • Raspberry Pi (35 Euro) with openHAB installed
  • Elro Wireless Home Control AB440S/3C (3 Remote controlled power switches, 15 Euro)
  • 433Mhz RF Transmitter Module (2 Euro)
  • Some jumper cables & wire as antenna

Hardware setup

First, the RF Transmitter Module needs to be installed on the Raspberry Pi. Check your RF Module and Raspberry Pi for the correct connections (I will not go into detail here as a lot of tutorials are already available online).

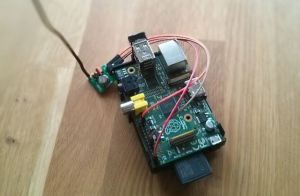
The RF Transmitter module has three pins: Ground, VCC and Data. In my case, I needed to connect Data with GPIO 17:

Raspberry Pi with 433 MHz Transmitter

I also soldered an antenna to the transmitter which tremendously increased the range.

Software installation/configuration

First, we need to install wiringPi (library to access the GPIO pins of the Raspberry Pi) as it is a prerequisite for rcswitch-pi (library to talk to the RF Transmitter):

sudo mkdir /opt/rc-switch
cd /opt/rc-switch
sudo git clone git://git.drogon.net/wiringPi
cd wiringPi
sudo ./build

Now we install rcswitch-pi:

cd /opt/rc-switch
sudo git clone https://github.com/r10r/rcswitch-pi.git
cd rcswitch-pi
sudo make

Afterwards, we should be able to trigger the remote switch via

sudo ./send 11111 3 1

where 11111 is the System-Code and 3 is the unit-code according to our DIP-switch settings on the remote power switch to be controlled. The last parameter is 1 (ON) or 0 (OFF).

ELRO Remote Switch DIP Settings

OpenHAB configuration

exec binding

First, if not done already, we need to copy the exec binding (included in the openHAB addons package) to our openHAB/addons directory. This binding enables us to later call the command line (and therefore rc-switch) from openHAB.

Switch scripts

Now we can create two shell scripts in folder /opt/rc-switch/ to be called from openHAB: switchOn.sh and switchOff.sh:

#!/bin/bash
for run in {1..5}
do
/opt/rc-switch/rcswitch-pi/send 11111 $1 1
done

And also make them executable:

sudo chmod +x switchOn.sh switchOff.sh

The unit-code is passed as the first parameter ($1) to the script. The system-code (11111) is hard-coded. If we’d have more than one system-code, we need to pass it as a parameter, too.

On the one hand, these two scripts simplify calls from openHAB (as we will see soon). On the other hand, it increases the chance for successfully transmitting the command by sending it multiple (5) times. As there is no message to acknowlegde retrieval of the command by the remote switch and messages sometimes get lost/distorted, this is probably the easiest way to make sure the switch command gets through eventually.

Allow execution of the switch scripts as root

If we run openHAB as user ‘openhab’ (i.e. not as root), we need to make sure user ‘openhab’ is allowed to run the switch scripts as root without the need to enter a password, because wiringPi needs to be run as root.

One way to achieve this is to run sudo visudo and allow user openhab to run scripts on path /opt/rc-switch/switch* (which includes switchOn.sh and switchOff.sh) as root without entering a password:

# User privilege specification
root    ALL=(ALL:ALL) ALL
openhab ALL=NOPASSWD: /opt/rc-switch/switch*

Be careful when using visudo as it is easy to mess up the complete system!

Add openHAB item

Finally it is time to add a switch to openHAB to turn our lights on and off! With all the preparation we have done above, this is quite simple now:

Switch Lamp_LV_Standing "Standing Lamp" {exec=">[OFF:sudo /opt/rc-switch/switchOff.sh 1] >[ON:sudo /opt/rc-switch/switchOn.sh 1]"}

This will add an item to openHAB to turn our remote switch with unit-code 1 on and off. After adding the item to our sitemap, the switch should appear in openHAB:

openHAB Light Items

Disadvantages

Even though this solution is a great way to add smart lamps to one’s home, it has two disadvantages:

  1. One-way communication: The communication is only from the RF Transmitter / Raspberry Pi to the power switch. We neither get feedback if the light on/off signal really reached the power switch nor it is possible to check the current state of the remote switch. – No security (can be controlled from the outside / from neighbours)
  2. No Security: The communication channel is not secure, which means anybody who is in transmission range and knows/guesses the system and unit code of the power switches can switch our lights on and off. This might be acceptable for LED lamps, but I wouldn’t connect devices like an electricity heater.

Summary

All in all, if one can live with these disadvantages and the manual configuration, this is probably the cheapest solution for smart lamps and a great way to get started with a smart home!

Here is a video with the smart lamps in action, controlled via HABDroid (Android mobile client for openHAB):

Geräteverfügbarkeit überprüfen mit openHAB

Das Network Health Binding von openHAB überprüft, ob Geräte (Computer, Smartphones, SmartTVs, …) aktuell im Netzwerk verfügbar bzw. ansprechbar sind.

Um festzustellen, ob ein Netzwerkgerät online ist, verwendet das Binding die Java-Funktion InetAddress.isReachable(). Leider scheint es mit dieser Funktion öfters Probleme zu geben (siehe z.B. hier), wenn man diese plattformübergreifend verwendet.

So erkennt das Network Health-Binding auf meinem Raspberry PI  meinen Windows 7 PC immer als offline, obwohl z.B. ein einfach ping vom Terminal des Raspberry PI ohne Probleme funktioniert.

in meinem Fall scheint das Problem an der Windows-Firefall zu liegen, denn sobald ich diese komplett abschalte (was natürlich keine dauerhafte Lösung ist), funktioniert das Binding korrekt.  Leider konnte ich bis jetzt jedoch keine Firewall-Regel finden, welche den Network Health Ping durchlasst.

Als Alternative verwende ich nun das Exec Binding, wie in diesem Beitrag beschreiben:

Switch PingableThing { exec="<[/bin/sh@@-c@@ping -c 1 192.168.1.10 | grep \"packets transmitted\" | sed -e \"s/.*1 received.*/ON/\" -e \"s/.*0 received.*/OFF/\":30000:REGEX((.*))]" }

Dieser Ping wird alle 30 Sekunden ausgeführt und aktualisiert den Switch entsprechend. Damit funktioniert es einwandfrei. Trotzdem würde ich gerne herausfinden, wie ich die Windows-Firewall für den Ping des Network Health-Bindings konfigurieren muss.